React와 History API 사용하여 SPA Router 기능 구현하기 (react-router-dom 라이브러리 뜯어보기)
어떻게 해결해야 될 지 생각해보자..
어제 진행했던 강의에서 티스토리나, 벨로그를 참고하기 보다는 공식문서와 오픈소스를 보는게 좋다고 언급해주셨으니 최대한 공식 레퍼런스에서 참고를 많이 해보자.
근데 사실 이번에 진행하는 주제를 구현해놓은 라이브러리가 이미 있지 않나?
바로 많이 사용했던 react-router-dom 이라는 라이브러리인데, 해당 라이브러리에 Router를 담당하는 Link 라는 기능이 있기 때문에 react-router-dom의 소스 코드를 보면 정답이 있지 않을까?! 생각했다.
https://github.com/remix-run/react-router
여기 들어가보면 react-router의 코드를 훔쳐볼 수 있다.
react-router-dom이 어딨지 어딨지.. 찾아보니까, packages라는 폴더 안에 보면 react-router-dom이라는 폴더가 있다.
그 중에서도 Link를 어디 구현했는지 찾아보니까, index.tsx 파일에서 찾을 수 있었다.
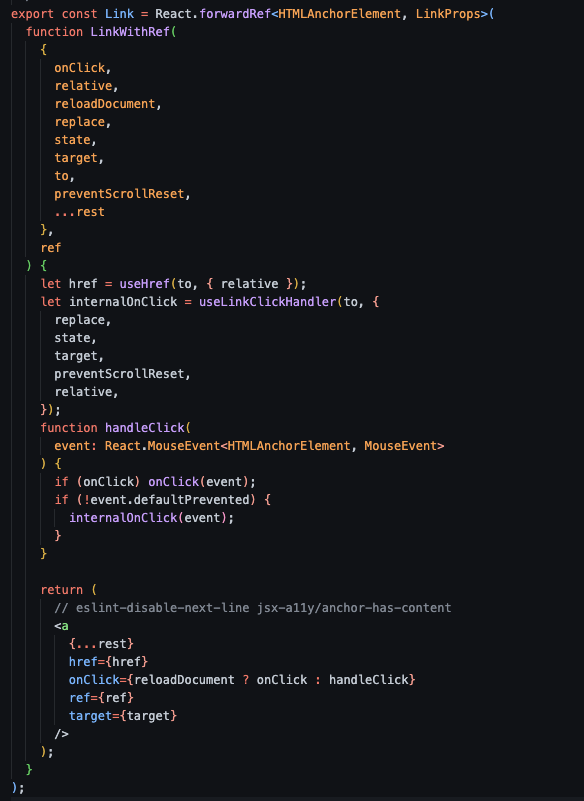
뭐가 많은데, 어쨌든 a 태그를 만들어서 반환하고 있고 a 태그에 뭔가 주렁주렁 달려있다.
위에서 부터 천천히 읽어보자라고 생각했는데, 처음부터 막혔다. forwardRef가 뭔데 ㅋㅋ
forwardRef에 대해서 알아보자
https://ko.reactjs.org/docs/forwarding-refs.html
리액트 공식문서에서 forwardRef에 대해서 알아보자.
쭉 읽어보니까, Ref 전달하기는 일부 컴포넌트가 수신한 ref를 받아 조금 더 아래로 전달(즉, "전송")할 수 있는 옵트인 기능입니다. 라고 되어있다.
const FancyButton = React.forwardRef((props, ref) => (
  <button ref={ref} className="FancyButton">
    {props.children}
  </button>
));

// 이제 DOM 버튼으로 ref를 작접 받을 수 있습니다.
const ref = React.createRef();
<FancyButton ref={ref}>Click me!</FancyButton>;

아.. ref는 props로 전달이 안되니까 하위 컴포넌트한테 넘겨주려면 forwardRef 함수를 써서 넘기는거구나.
음 근데 지금 내 상황은 ref를 만들어서 넘겨주려는건 아닌데.. 일단 넘어가보자.
라이브러리 세계 여행 시작
실제로 라우팅을 하게 하는건 onClick 이벤트에서 발생하는 것일텐데 onClick을 보니까 reloadDocument의 값에 따라 onClick 또는 handleClick이 실행된다.
reloadDocument의 타입을 보니까 boolean이면서 optional이다.
https://reactrouter.com/en/v6.3.0/api#link
공식 문서를 보면, 말 그대로 reloadDocument는 SPA를 위한 라우팅을 하지 않고, 기존의 a 태그처럼 브라우저가 이벤트를 핸들링할 수 있게 넘겨준다.
보통의 상황에서는 reloadDocument를 사용하지 않을 테니까, handleClick 함수가 실행될 것이다.
handleClick 함수에서는 뭘 할까?
function handleClick(event: React.MouseEvent<HTMLAnchorElement, MouseEvent>) {
  if (onClick) onClick(event);
  if (!event.defaultPrevented) {
    internalOnClick(event);
  }
}
onClick 값에 따라 onClick(event)가 실행되고, event.defaultPrevented의 값에 다라 또 무언가 실행되고 있다.
onClick은 위에서 forwardRef의 콜백 함수의 인자에서 받아오고 있는데, LinkProps를 보니까 onClick이 없다.
export interface LinkProps extends Omit<
  React.AnchorHTMLAttributes<HTMLAnchorElement>,
  'href'
> {
  reloadDocument?: boolean;
  replace?: boolean;
  state?: any;
  preventScrollReset?: boolean;
  relative?: RelativeRoutingType;
  to: To;
}
음? 그럼 onClick은 어디서 가져오는거지.. forwardRef의 타입을 보면 HTMLAnchorElement, LinkProps 2개가 걸려있는데,
아 그러면 onClick은 a 태그에 있는걸 말하는거구나.
그래서 onClick 이벤트가 넘어오면 그걸 실행시켜주고, event.defaultPrevented가 아닐 때는 internalOnclick 함수를 실행하는데, 여기서 event.defaultPrevented이 뭔지 MDN에서 찾아봤다.
https://developer.mozilla.org/en-US/docs/Web/API/Event/defaultPrevented
function stopLink(event) {
  event.preventDefault();
}

function logClick(event) {
  const log = document.getElementById('log');

  if (event.target.tagName === 'A') {
    log.innerText = event.defaultPrevented
      ? `Sorry, but you cannot visit this link!\n${log.innerText}`
      : `Visiting link…\n${log.innerText}`;
  }
}

const a = document.getElementById('link2');
a.addEventListener('click', stopLink);
document.addEventListener('click', logClick);
저렇게 event.preventDefault()가 걸려있는지, 안걸려있는지 확인할 수 있는 함수인가보다.
다시 위로 돌아가서, !event.defaultPrevented는 preventDefault()가 안걸려있을 때를 의미하는 것이다.
음? 앞에서 reloadDocument가 false일 때 handleClick이 실행되는데, 그렇다면 새로고침을 안하겠다는 뜻 아닌가? 근데 왜 handleClick 내부에서 preventDefault()가 안돼있을 때, 뭔가 다시 실행할까..
정리하면, 사용자는 reload(=새로고침 안함)를 하지 않겠다고 옵션을 줬는데 그래서 실행된 handleClick 함수 내부에서는 event.preventDefault()가 안걸려있으면(=새로고침 할거임) 뭔가 실행하네????
아! 원래 a 태그에는 새로고침 되는게 기본 옵션인데, reload 안한다고 줬으면 당연히 event.preventDefault()가 안걸려있을테니까 internalOnclick 함수 내부에서 이벤트를 막아주고, 뭔가 실행하는건가?
근데 그럼 Link에다가 event.preventDefault() 걸어버리면 아무 것도 안하는거야???
그래서 internalOnclick을 보니까 얘는 useLinkClickHandler의 반환값을 받는거네.
그럼 useLinkClickHandler를 보자.
export function useLinkClickHandler<E extends Element = HTMLAnchorElement>(
  to: To,
  {
    target,
    replace: replaceProp,
    state,
    preventScrollReset,
    relative,
  }: {
    target?: React.HTMLAttributeAnchorTarget;
    replace?: boolean;
    state?: any;
    preventScrollReset?: boolean;
    relative?: RelativeRoutingType;
  } = {},
): (event: React.MouseEvent<E, MouseEvent>) => void {
  let navigate = useNavigate();
  let location = useLocation();
  let path = useResolvedPath(to, { relative });

  return React.useCallback(
    (event: React.MouseEvent<E, MouseEvent>) => {
      if (shouldProcessLinkClick(event, target)) {
        event.preventDefault();

        // If the URL hasn't changed, a regular <a> will do a replace instead of
        // a push, so do the same here unless the replace prop is explicitly set
        let replace =
          replaceProp !== undefined
            ? replaceProp
            : createPath(location) === createPath(path);

        navigate(to, { replace, state, preventScrollReset, relative });
      }
    },
    [
      location,
      navigate,
      path,
      replaceProp,
      state,
      target,
      to,
      preventScrollReset,
      relative,
    ],
  );
}
또 뭔가를 잔뜩 실행하고 있는데, 중간에 보면 event.preventDefault()가 보이고 navigate를 실행하고 있다. 얘가 이벤트를 막아주고 라우팅을 해주는 진짜 함수구나.
navigate는 뭔가 이동하기 전에 특정 로직을 더 수행해야 된다거나, 특정 상황에 이동이 되게 하고 싶을 때 쓰던 함수였는데 알고보니까 Link가 useNavigate를 써서 만든거구나..... 신기하다.
아니 근데 useNavigate도 react-router-dom에서 만든 Hook인데, 쟤부터 뜯어봤어야 하는거 아닌가 아 ㅋㅋ 😩
그래서 useNavigate를 찾아봤다.. 얘는 react-router에 있네
뭐가 많은데..... 여기가 중요한 부분인 것 같다.
if (basename !== '/') {
  path.pathname =
    path.pathname === '/' ? basename : joinPaths([basename, path.pathname]);
}

(!!options.replace ? navigator.replace : navigator.push)(
  path,
  options.state,
  options,
);
위에 조건문은 이전 경로가 있으면 붙여서 path 만들어주는 것 같고, 밑에 보면 replace에 따라 함수가 실행되는데 저게 option이라서 따로 값을 안주면 보통 navigator.push가 실행이 될 것이다.
navigator.push는 뭘 할까.. 어지럽다.
navigator가 어디서 나온건고 하니,
let { basename, navigator } = React.useContext(NavigationContext);
useContext를 써서 전역 상태로 관리하고 있는거에서 가져온거네?
그래서 NavigationContext를 또 찾으러 갔다.
export interface Navigator {
  createHref: History['createHref'];
  go: History['go'];
  push(to: To, state?: any, opts?: NavigateOptions): void;
  replace(to: To, state?: any, opts?: NavigateOptions): void;
}

interface NavigationContextObject {
  basename: string;
  navigator: Navigator;
  static: boolean;
}

export const NavigationContext = React.createContext<NavigationContextObject>(
  null!,
);
NavigationContext는 createContext로 NavigationContextObject 얘네들을 넣는건가보다.
NavigationContextObject를 보면, 안에 navigator가 있고 navigator의 인터페이스를 보면 push가 있다.
그래서 저 push를 찾으러 또 헤메고 다님..
let navigator = React.useMemo((): Navigator => {
  return {
    createHref: router.createHref,
    go: (n) => router.navigate(n),
    push: (to, state, opts) =>
      router.navigate(to, {
        state,
        preventScrollReset: opts?.preventScrollReset,
      }),
    replace: (to, state, opts) =>
      router.navigate(to, {
        replace: true,
        state,
        preventScrollReset: opts?.preventScrollReset,
      }),
  };
}, [router]);
navigator에 있는 push를 찾고 보니까 얘는 또 router.navigate를 실행하는거였음.
그래서 또 router를 찾으러 갔습니다....
// A Router instance can be created using `createRouter`:

// Create and initialize a router.  "initialize" contains all side effects
// including history listeners and kicking off the initial data fetch
let router = createRouter({
  // Routes array
  routes: ,
  // History instance
  history,
}).initialize()
저기 createRouter라는 함수 안에 있는 initialize를 호출하면 router를 반환을 한다.
// Initialize the router, all side effects should be kicked off from here.
// Implemented as a Fluent API for ease of:
//   let router = createRouter(init).initialize();
function initialize() {
  // If history informs us of a POP navigation, start the navigation but do not update
  // state.  We'll update our own state once the navigation completes
  unlistenHistory = init.history.listen(({ action: historyAction, location }) =>
    startNavigation(historyAction, location),
  );

  // Kick off initial data load if needed.  Use Pop to avoid modifying history
  if (!state.initialized) {
    startNavigation(HistoryAction.Pop, state.location);
  }

  return router;
}
거기서 또 navigate 함수를 찾아보고 거기서 반환하는 startNavigation을 찾아서
return await startNavigation(historyAction, location, {
  submission,
  // Send through the formData serialization error if we have one so we can
  // render at the right error boundary after we match routes
  pendingError: error,
  preventScrollReset,
  replace: opts && opts.replace,
});
completeNavigation(location, {
  matches,
  loaderData,
  errors,
});
completeNavigation을 또 찾아서.......
updateState({
  // Clear existing actionData on any completed navigation beyond the original
  // action, unless we're currently finishing the loading/actionReload state.
  // Do this prior to spreading in newState in case we got back to back actions
  ...(isActionReload ? {} : { actionData: null }),
  ...newState,
  ...newLoaderData,
  historyAction: pendingAction,
  location,
  initialized: true,
  navigation: IDLE_NAVIGATION,
  revalidation: 'idle',
  // Don't restore on submission navigations
  restoreScrollPosition: state.navigation.formData
    ? false
    : getSavedScrollPosition(location, newState.matches || state.matches),
  preventScrollReset: pendingPreventScrollReset,
});

if (isUninterruptedRevalidation) {
  // If this was an uninterrupted revalidation then do not touch history
} else if (pendingAction === HistoryAction.Pop) {
  // Do nothing for POP - URL has already been updated
} else if (pendingAction === HistoryAction.Push) {
  init.history.push(location, location.state);
} else if (pendingAction === HistoryAction.Replace) {
  init.history.replace(location, location.state);
}
보면 뭔가 상태를 업데이트하고, history.push를 하는데
function push(to: To, state?: any) {
  action = Action.Push;
  let location = createLocation(history.location, to, state);
  if (validateLocation) validateLocation(location, to);

  let historyState = getHistoryState(location);
  let url = history.createHref(location);

  // try...catch because iOS limits us to 100 pushState calls :/
  try {
    globalHistory.pushState(historyState, '', url);
  } catch (error) {
    // They are going to lose state here, but there is no real
    // way to warn them about it since the page will refresh...
    window.location.assign(url);
  }

  if (v5Compat && listener) {
    listener({ action, location });
  }
}
pushState를 하는걸 확인할 수 있다.
조금 정리해보면, 이동할 path를 상태로 저장해두고 상태에 따라서 컴포넌트를 변경해서 렌더링해주고 pushState를 통해서 브라우저에 표시된 주소를 변경한다.
export function Routes({
  children,
  location,
}: RoutesProps): React.ReactElement | null {
  let dataRouterContext = React.useContext(DataRouterContext);
  // When in a DataRouterContext _without_ children, we use the router routes
  // directly.  If we have children, then we're in a descendant tree and we
  // need to use child routes.
  let routes =
    dataRouterContext && !children
      ? (dataRouterContext.router.routes as DataRouteObject[])
      : createRoutesFromChildren(children);
  return useRoutes(routes, location);
}
이 Routes라는 컴포넌트가 DataRouterContext, 아마도 아까 위에서 전역상태로 관리하고 있을 path를 꺼내서 이름이 같은 Route를 찾아서 연결해준다.
그래서 어떻게 구현함?
- path를 전역으로 관리해서 변화할 때, match 되는 컴포넌트 렌더링 시킴
- pushState 써서 브라우저에 나오는 URL 바꿔줌
path를 전역 상태로 만들어야 함. 그래야 Route 컴포넌트에서 변화를 감지하고, 렌더링을 다시 할테니까..
먼저 router를 만들어서 Context Provider를 만들자. 여기서는 Provider를 만들고 자식 컴포넌트들이 context를 공유할 수 있게끔 만들어준다.
import { useContext, useState } from 'react';
import { routerContext } from './routerContext';

export const Router = ({ children }: any) => {
  const [path, setPath] = useState(window.location.pathname);
  const changePath = (path: string) => {
    setPath(path);
  };
  const contextValue = {
    path,
    changePath,
  };

  return (
    <routerContext.Provider value={contextValue}>
      {children}
    </routerContext.Provider>
  );
};
공유할 상태들은 path와 changePath인데 자식 컴포넌트에서 changePath를 통해서 상태를 변화시키면 Routes 컴포넌트에서 변화한 path 상태랑 일치하는 컴포넌트를 찾아서 렌더링 시킨다.
import { Children, useContext } from 'react';
import { routerContext } from './routerContext';

export const Routes = ({ children }: any) => {
  const { path } = useContext(routerContext);

  let element = null;

  Children.forEach(children, (child) => {
    if (child.props.path !== path) {
      return;
    }
    element = child.props.element;
  });

  return element;
};
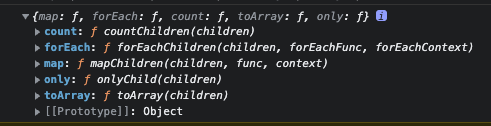
여기서 React.Children이라는게 있는데 console.log 찍어보면 이런게 나온다.
Children은 forEach나 map 같은 메서드를 사용할 수 있고 하위 노드들을 보여준다. 즉, Routes 아래에다가 Route 여러 개를 넣고 반복문을 돌면서 Route의 props에 있는 path를 확인한다. 일치하면 element를 해당 Route의 element로 바꿀꺼고, element를 반환하면 된다.
interface IProps {
  path: string;
  element: React.ReactNode;
}

export const Route = ({ path, element }: IProps) => null;
Route는 그냥 껍데기용이고 element를 넘겨줄껀데 얘네 타입을 어떻게 해야될지 모르겠다.. 더 찾아봐야지
어쨌든 이제 App.tsx로 돌아가서 얘네를 합쳐주면 끝난다.
import About from './About';
import './App.css';
import Home from './Home';
import { Route } from './Route';
import { Router } from './Router';
import { Routes } from './Routes';

function App() {
  return (
    <div className="App">
      <Router>
        <Routes>
          <Route path="/" element={<Home />} />
          <Route path="/about" element={<About />} />
        </Routes>
      </Router>
    </div>
  );
}

export default App;
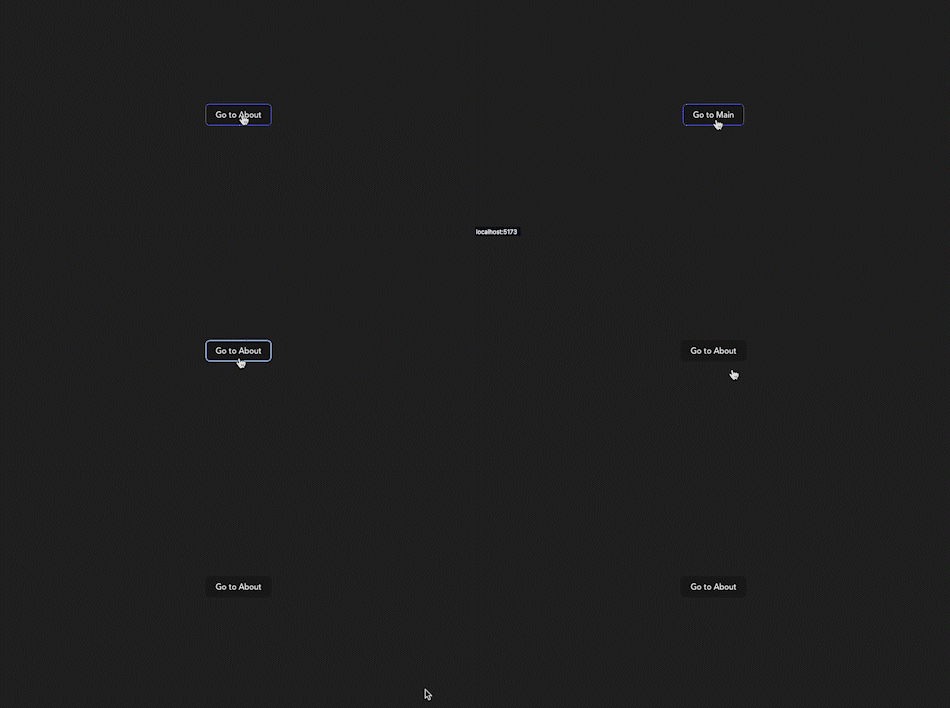
이제 상태가 변함에 따라, 화면에 보여질 컴포넌트가 변한다.
근데, 저거 변경하고 새로고침하면 어떻게 될까?
context에서 path의 초기값을 브라우저의 URL에서 가져오기 때문에 홈 화면으로 돌아간다. 그래서, 상태가 변할 때 URL도 변경 시켜줘야 되는데 여기가 2번이다.
window.history 객체에 pushState라는 메서드가 있다.
https://developer.mozilla.org/en-US/docs/Web/API/History/pushState
이거 쓰면 페이지 전환없이 URL만 바꿔줄 수 있다.
그래서 아까 changePath할 때, pushState도 같이 해주면 된다.
const changePath = (path: string) => {
  setPath(path);
  history.pushState({ path }, '', path);
};
뒤로 가기 문제도 해결해보자!
현재 상태에서 뒤로 가기를 하면 브라우저의 URL은 변경이 되지만 화면에 보이는 컴포넌트는 변경이 안된다. pushState를 했던 걸 반대로 뒤로가기를 할 때는, popState를 해줘야된다. 뒤로 가기 이벤트가 들어올 때 브라우저에 쌓인 스택을 꺼내서, path 상태를 변경해주면 된다.
// Router.tsx
useEffect(() => {
  const handlePopstate = (event: PopStateEvent) => {
    setPath(event.state?.path || '/');
  };

  window.addEventListener('popstate', handlePopstate);

  return () => {
    window.removeEventListener('popstate', handlePopstate);
  };
}, []);
이렇게 useEffect Hook을 추가해서, 새로운 path로 이동할 때 handlePopstate가 호출이 되면서 path 상태를 변경해주면 뒤로가기도 정상적으로 된다.